Table of Contents (Start)
Device Mover
This documentation applies to NMS version 5.4. An online version of the software can be found here.
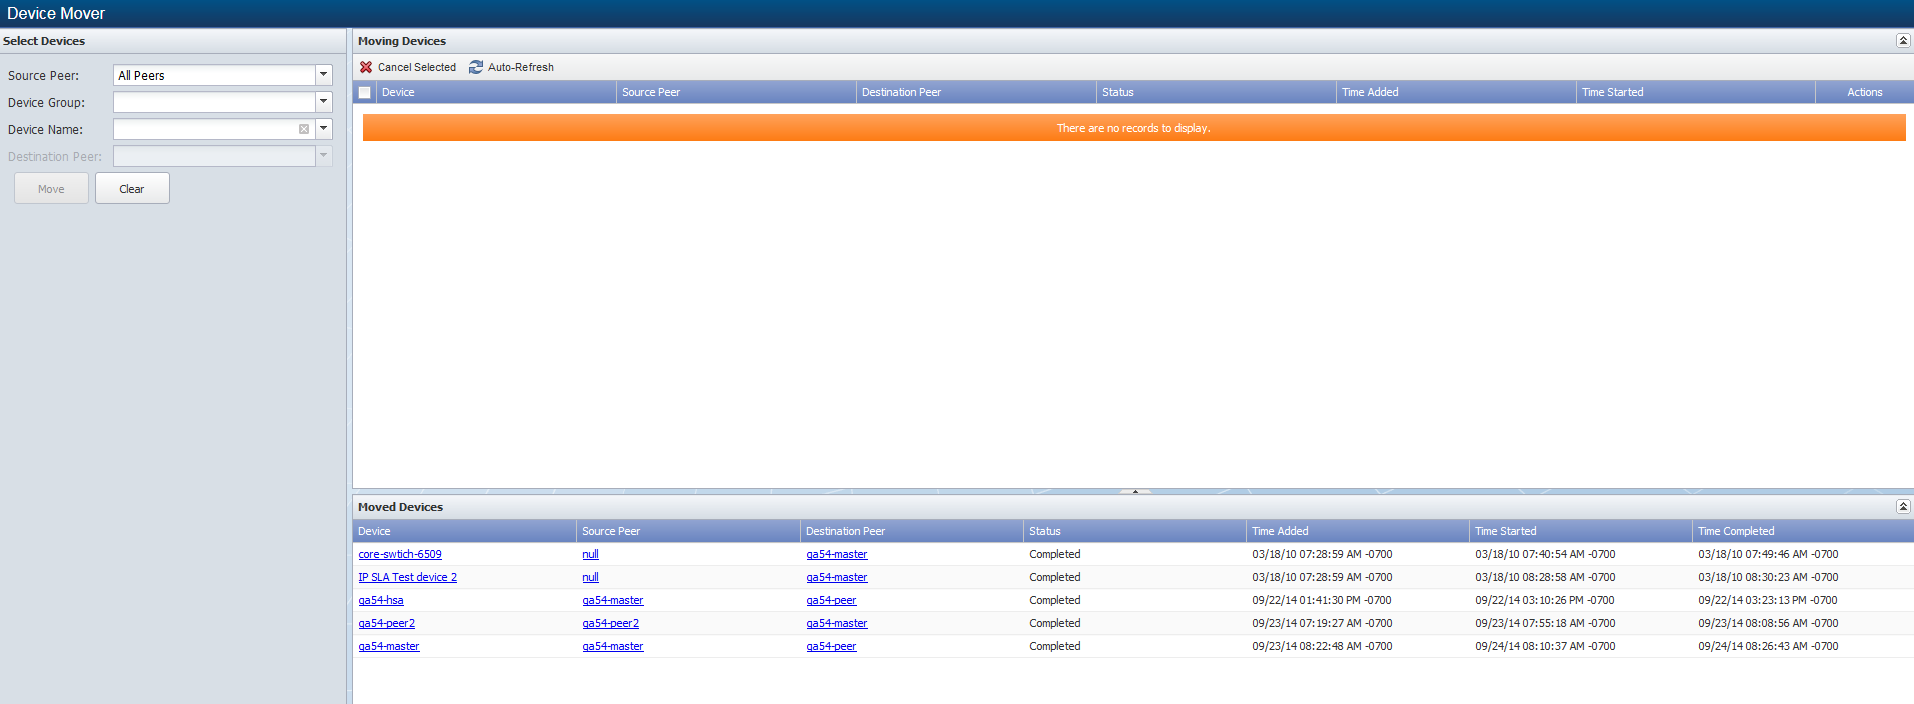
The Device Mover enables you to move a device from one peer to another peer when you have a multi-peer cluster.
To access the Device Mover from the navigation bar, click the Devices menu and select Device Mover. You can also access the Device Mover from the Edit Device page.
If you have a single peer cluster, the fields on the Device Mover are disabled.

There are several reasons to move devices from one peer to another.
-
When a peer exceeds the license capacity, that peer does not discover any objects that go beyond the peer capacity. This prevents a peer from being overloaded which impacts the integrity of the peer. No metrics are collected from objects that are not discovered.
-
When a peer discovers a device and the device is physically closer to a different peer, you may want to move the device to the peer that is physically closer to prevent latency issues.
Move Devices
The default display enables you to select to move any device from all peers to a destination peer. When you move a device that has been discovered, the move may take a relatively long time period because of the amount of data collected for the device.
-
Click the Source Peer drop-down and select the peer from which you want to move devices.
-
Select All Peers to display all devices in the Device Name drop-down list. This enables you to move any device from any peer.
-
Select a specific peer to display the devices the peer polls in the Device Name drop-down list. When you select a peer, the capacity of the peer displays below the Source Peer field (number of elements polled/number of elements the peer is licensed to poll, percentage of peer capacity in use).
-
-
Click the Device Group drop-down and select a device group/device type to display devices that are members of the device group/device type in the Device Name drop-down list.
-
Click the Device Name drop-down and select the devices to move. The number of elements polled on the selected devices displays below the Device Name field.
-
Click the Destination Peer drop-down and select the peer to which to move the devices you select. The capacity of the peer you select appears below the Destination Peer field.
-
Click Move to add the devices to the Moving Devices section on the right. Devices in the Moving devices section are queued to move the next time the move engine runs.
Moving Devices
The Moving Devices section displays the devices you schedule to move and enables you to monitor the progress of the move.
-
Select - Select the check box for each device you want to cancel the move and click Cancel Selected or click X in the Actions column. After a move starts you cannot cancel the move. Successful moves are removed from the list.
-
Device - Displays the name of the device to move.
-
Source Peer - Displays the name of the peer from which the device is to move.
-
Destination Peer - Displays the name of the peer to which the device is to move.
-
Status - Displays the status of the move. Displays n/a when the move has yet to occur.
-
Time Added - Displays the time the move was added to the list.
-
Time Started - Displays the time the move started.
Moved Devices
The Moved Devices section displays the list of devices that have been moved.
-
Device - Displays the name of the device that was moved. Click the device name to display the Edit Device for the device.
-
Source Peer - Displays the name of the peer from which the device was moved. Click the name of the peer to display the Cluster Manager appliance level statistics for the source peer.
-
Destination Peer - Displays the name of the peer to which the device was moved. Click the name of the peer to display the Cluster Manager appliance level statistics for the destination peer.
-
Status - Displays the status of the move.
-
Time Added - Displays the time the move was added to the list.
-
Time Started - Displays the time the move started.
-
Time Completed - Displays the time the move was completed.