
Table of Contents (Start)
SevOne NMS 5.4 Quick Start Guide - Telephony
SevOne NMS Documentation
All SevOne NMS user documentation is available online from the SevOne Support website.
-
Enter email address and password.
-
Click Login.
-
Click the Solutions icon.
© Copyright 2015, SevOne Inc. All rights reserved. SevOne, SevOne PAS, SevOne DNC, Deep Flow Inspection, and Rethink Performance are either registered trademarks or trademarks of SevOne Inc. Other brands, product, service and company names mentioned herein are for identification purposes only and may be trademarks of their respective owners.
Introduction
This document describes the best practices for SevOne NMS users to implement and manage the polling of Telephony data from your network.
The Telephony plugin polls CallManager and SIP devices for telephony data and no changes need to be made for SIP and CDR telephony devices. This document describes how to enable Avaya devices to send RTCP data to SevOne NMS. This workflow is outside of the SevOne NMS application and may not present all of the steps your network requires to enable devices to send RTCP data. You may need to reference the device manufacturer's documentation.
In SevOne NMS, plugins are mechanisms that poll (collect, ask for, etc.) data from technologies. Plugins define a way to get data, usually via some protocol such as SNMP, ICMP, WMI, etc. Many plugins are automatically enabled when you add a device to SevOne NMS so you can poll applicable objects with minimal configuration. Telephony can require device specific input.
Objects are discrete components of a device or a software component that have one or more performance indicators on which SevOne NMS can monitor, trend, and alert. SevOne NMS considers an element to be any performance object. Indicators are grouped by indicator types which in turn are grouped by object types.
-
Object Types - Define logical things to ask for information about.
-
Indicator Types - Define kinds of metrics that object types can have.
The Telephony plugin detects and monitors the Telephony indicators for the object types SevOne NMS provides for real time support for Cisco, SIP, and RTCP systems.
SevOne NMS uses the International Telecommunication Union G.107: E-model computational model for use in calculating telephony statistics. For details go to https://www.itu.int/rec/T-REC-G.107/en.
Avaya PBX Call Statistics
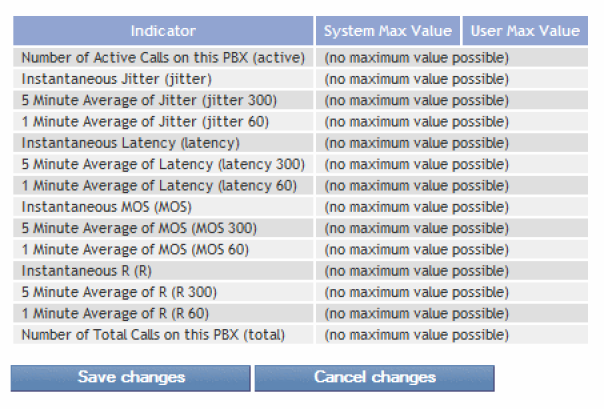
An Avaya MIB contains the following.
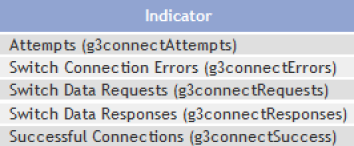
Connections
CPU Usage
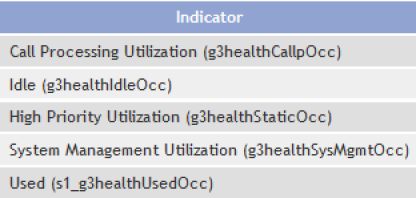
Health Group
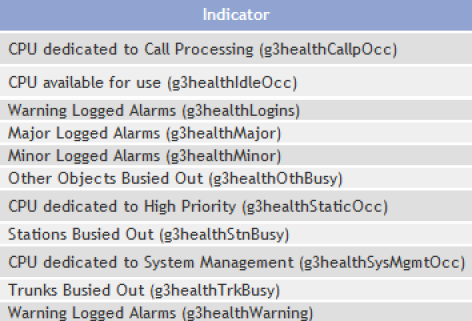
PNC Health Group
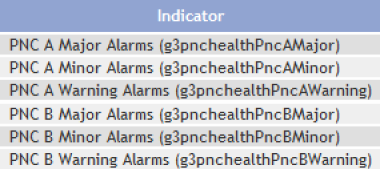
Cisco CDR
A Cisco CDR is composed of fields that describe the exchange including:
-
The number making the call (calling party)
-
The number receiving the call (called party)
-
When the call started (date and time)
-
How long the call was (duration)
-
The phone number charged for the call
-
The identifier of the telephone exchange writing the record
-
A sequence number identifying the record
-
Additional digits on the called number used to route or charge the call
-
The result of the call (whether it was answered, busy etc)
-
The route by which the call entered the exchange
-
The route by which the call left the exchange
-
Call type (voice, SMS, etc.)
-
Any fault condition encountered
Common Telephony Performance Indicators and Reports
Telephony performance indicators include the following.
-
Call ID
-
Destination IP
-
Destination Phone
-
Destination Subnet
-
Duration
-
Jitter
-
Latency
-
Mean Opinion Score (MOS)
-
PBX Name
-
R Value
-
Source
-
Source IP
-
Source Phone
-
Source Subnet
SIP
The Telephony plugin supports the SIP vq-rtcpxr which is a SIP event package for Voice Quality Reporting (RFC 6035) and listens for the following SIP messages.
-
Subscribe
-
Publish
-
Notify
-
etc.
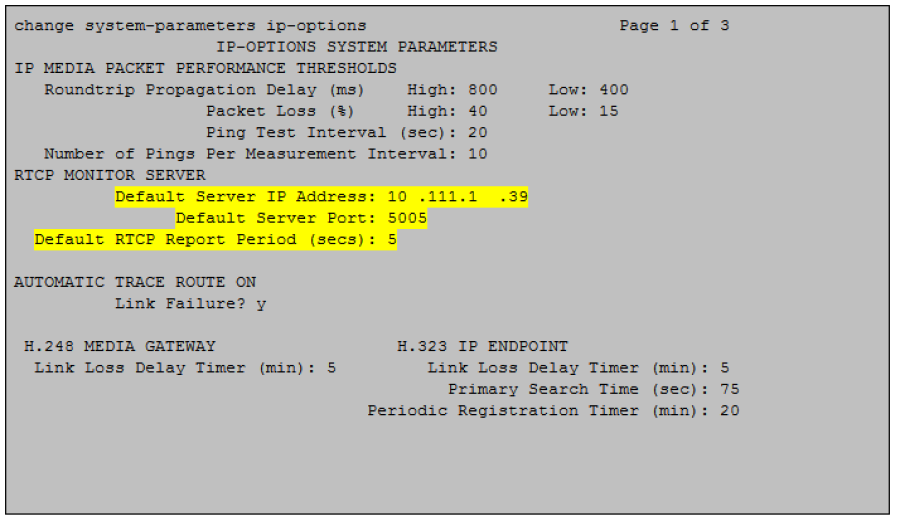
Enable Avaya Devices to Send RTCP Traffic to SevOne NMS
SevOne NMS polls CallManager and SIP devices for telephony data and no changes need to be made for SIP and CDR telephony devices. This chapter describes how to enable Avaya devices to send RTCP data to SevOne NMS. This workflow is outside of the SevOne NMS application and may not present all of the steps your network requires to enable devices to send RTCP data. You may need to reference the device manufacturer's documentation. For Avaya devices, make the following entries in the Avaya Communications Manager to configure the device to send telephony data to SevOne NMS.
Enable Telephony Plugin
The Telephony plugin requires device specific configuration and is therefore disabled on new devices by default. The Device Manager provides access to the Edit Device page where you enable and configure the Telephony plugin for each device.

Perform the following steps to enable the Telephony plugin for each device from which to discover Telephony objects and to poll Telephony metrics.
-
From the navigation bar, click the Devices menu and select Device Manager to display the Device Manager.
-
Click
 next to a device to display the Edit Device page.
 -
In the plugin section (displays SNMP by default), click the drop-down and select Telephony.
-
Select the Telephony Capable check box to enable discovery of the Telephony object types and to poll Telephony data on the device.
-
In the PBX Name field, enter the name of the PBX that controls the device.
-
Click the Type drop-down arrow.
-
Select RTCP (Avaya) and complete the following fields:
-
In the Port field, enter the port on SevOne NMS on which to listen for telephony data.
-
In the Threads field, enter the number of worker threads to dedicate to this process.
-
Select the Time Synced check box to indicate the device is time synced.
-
-
Select SIP and complete the following fields:
-
In the Port field, enter the port on SevOne NMS on which to listen for telephony data.
-
In the Threads field, enter the number of worker threads to dedicate to this process.
-
-
Select CallManager and complete the following fields:
-
In the SFTP Host field, either enter the SFTP host name or select the Auto Detect check box to have the Telephony plugin detect the host.
-
In the CDR WSDL Path field, enter the path to the CDR WSDL.
-
In the Limit get_file_list field, enter the amount of invocation to which to limit get_file_list calls per minute.
-
In the Limit get_file field, enter the amount of invocation to which to limit get_file.
-
View the last import time.
-
-
-
Click Save.
Telephony Browser
The devices for which you enable the Telephony plugin appear on the Telephony Browser.
To access the Telephony Browser from the navigation bar, click the Applications menu and select Telephony Browser.
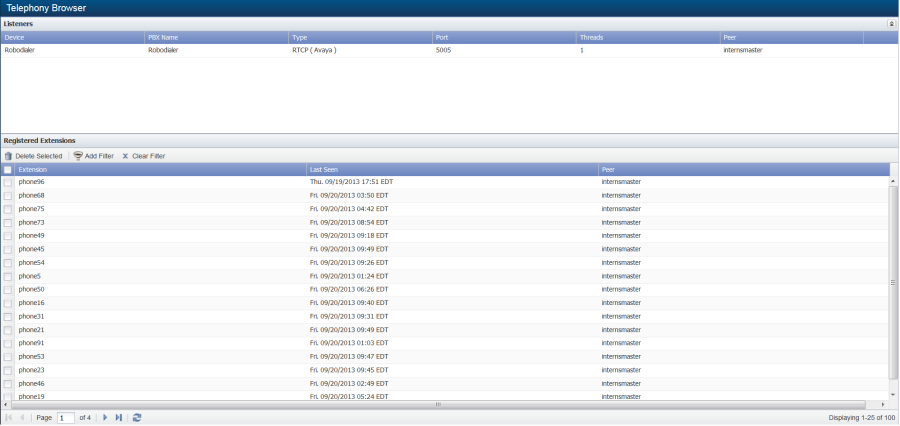
The Listeners section displays the devices for which you enable the Telephony plugin and the Registered Extensions section appears empty until someone makes a phone call from one of the listener devices at which point the Registered Extensions section displays both the calling extension and the called extension.
-
The Listeners section provides access to the Edit Device page and the Device Summary for each telephony enabled device.
-
The Registered Extensions section provides the ability to define filters to limit the number of extensions that appear in the list. The Delete Extensions button enables you to remove extensions from the list. The extension will reappear in the list when someone makes a call from the extension. To permanently remove an extension from the list you must disable the Telephony plugin for the device.
Telephony Report
The Telephony Reports page enables you to create and run telephony reports using rules based on call ID, destination, source, domain, duration, jitter, latency, r-value, MOS, etc.

-
To access the Telephony Reports page from the navigation bar, click the Applications menu and select Telephony Reports.
-
Click the Sort By drop-down and select the data column on which to sort report data.
-
Click the Sort Order drop-down and select Ascending or select Descending.
-
Click the Aggregate By drop-down and select an aggregation.
-
In the Result Limit field, enter the number of results to display in the report (maximum - 200).
-
Click the Time Span drop-down.
-
Select Past 2, 4, 8, 24, 48 Hours to display data from the current time back two, four, eight etc. hours until the current time.
-
Select Today to display data from 12:00am until now.
-
Select Yesterday to display data from 12:00am yesterday until 12:00am today.
-
Select This Week to display data from Sunday midnight until now.
-
Select Last Week, Last Month, Last Year to display data from midnight Sunday to midnight Sunday of the previous week, midnight on the first day of the previous month to midnight on the last day of the previous month, or midnight on January first to midnight on December 31st of the previous year.
-
Select This Month to display data from midnight on the first day of the current month until now.
-
Select Past 7 Days, Past 4 Weeks, Past 12 Weeks to displays data from the current time 7 days ago, 4 weeks ago, or 12 weeks ago until the current time today.
-
Select This Year to display data from midnight on the first day of the current year until now.
-
Select Custom to display additional fields to enable you to define the time span.
-
-
Click the Time Zone drop-down and select a time zone.
-
To filter the report results, click Add in the Filter section to display a pop-up.
-
Click the Field drop-down and select a field.
-
Click the Boolean drop-down and select a Boolean operator.
-
Click the Operator drop-down and select an operator.
-
In the Value field, enter the filter value.
-
The AND field appears enabled when you select the Between operator.
-
Click Save.
-
Repeat the filter steps to create additional filters.
-
-
Click Run Report.
Troubleshoot Telephony
Here are some frequently asked telephony questions.
Q) How do I reduce my license element count for telephony extensions/elements?
A) Change or disable the
Telephony plugin
for the device from the Edit Device page if you no longer want to monitor an extension and to reduce you telephony extension/element license count. Extensions appear on the Telephony Browser when you make a phone call on a device for which you enable the Telephony plugin. When you remove an extension from the Telephony Browser, the extension reappears on the Telephony Browser when SevOne NMS discovers the device.
Q) Why do I see duplicate registered extensions?
A) When a phone registers with a new IP address, SevOne NMS registers
the phone as a new extension with a different IP address.
Q) A phone number appears to have been logged on
for a long time, why?
A) Each phone extension continues to display on the
Telephony Browser
until you manually remove it.
Q)
Why do the IP addresses of other phones appear on the Telephony Browser?
A) When a call is redirected to a phone extension that is registered on a device for which you enable the Telephony plugin, the phone extension to which the call is forwarded appears on the Telephony Browser. Also, when a phone registers with a new IP address it gets registered as a new extension with a different IP address.
Q) Why do extensions that I remove from the Telephony Browser reappear on the Telephony Browser?
A) Extensions appear on the Telephony Browser when you make a phone call on a device for which you enable the Telephony plugin. When you remove an extension from the Telephony Browser, the extension reappears on the Telephony Browser when SevOne NMS discovers the device. Change or disable the Telephony plugin for the device from the Edit Device page if you no longer want to monitor an extension and to reduce you telephony extension/element license count.